Inviting your team
On Rowy, you can collaborate with your team members using fine granular permission controls. Rowy uses role-based access controls through Firestore Security Rules and custom claims in Firebase Authentication.
If interested, you can read more about:
Custom claims ↗
Firestore Security Rules ↗
Inviting users and assigning roles
'ADMIN' users can invite their team members/other users to gain access to data on Rowy. Access can be give at table level or field level using "User Management" section or Firebase Admin SDK.
- User Management
- Firebase Admin SDK
Rowy Run required
To use User Management, make sure you have setup Rowy via Option 1 guided process. If prompted, setup Rowy Run in the Rowy UI. If you are using the manual installation process, follow the instructions in the Firebase Admin SDK tab above.
Set user roles in User Management
In User Management, you can set the roles of users who have already signed in to your Rowy project. You can write any custom role and set your table roles accordingly.

Invite users in User Management
You can also invite a user who hasn’t signed in to your Rowy project in User Management.
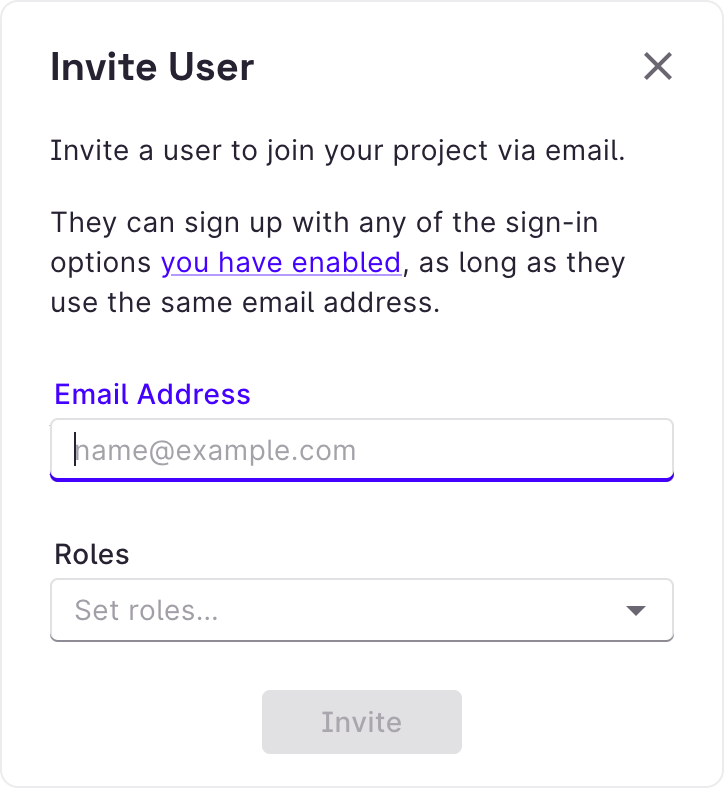
Click Invite User and enter the user’s email address and set their roles. Rowy Run will create a new Firebase Authentication user with those details. We’ll send them an email inviting them to sign up to your Rowy project.
Invite URL
By default, the invite URL sent in the email assumes you’ve deployed Rowy on rowy.app. If you’re self-hosting Rowy, this link will not work for your users.
Adding User Groups to the Project
User groups are a great way to organize your users and give them access to specific data. User groups can be added to a project by navigating to the User Management section in the sidebar.
Users can sign up with any of the sign-in options that have been enabled by the project admin, as long as they use the same email address.
Additionally, existing or newly created roles can be assigned to the user along with an invitation. Henceforth, the user will be able to access the data in the project according to the roles assigned to the user.
Adding User Groups to a Table
User Groups can be added to a table by altering the table settings. Under the Access Controls section in the settings, we can select the user group that needs to be given access to the table.
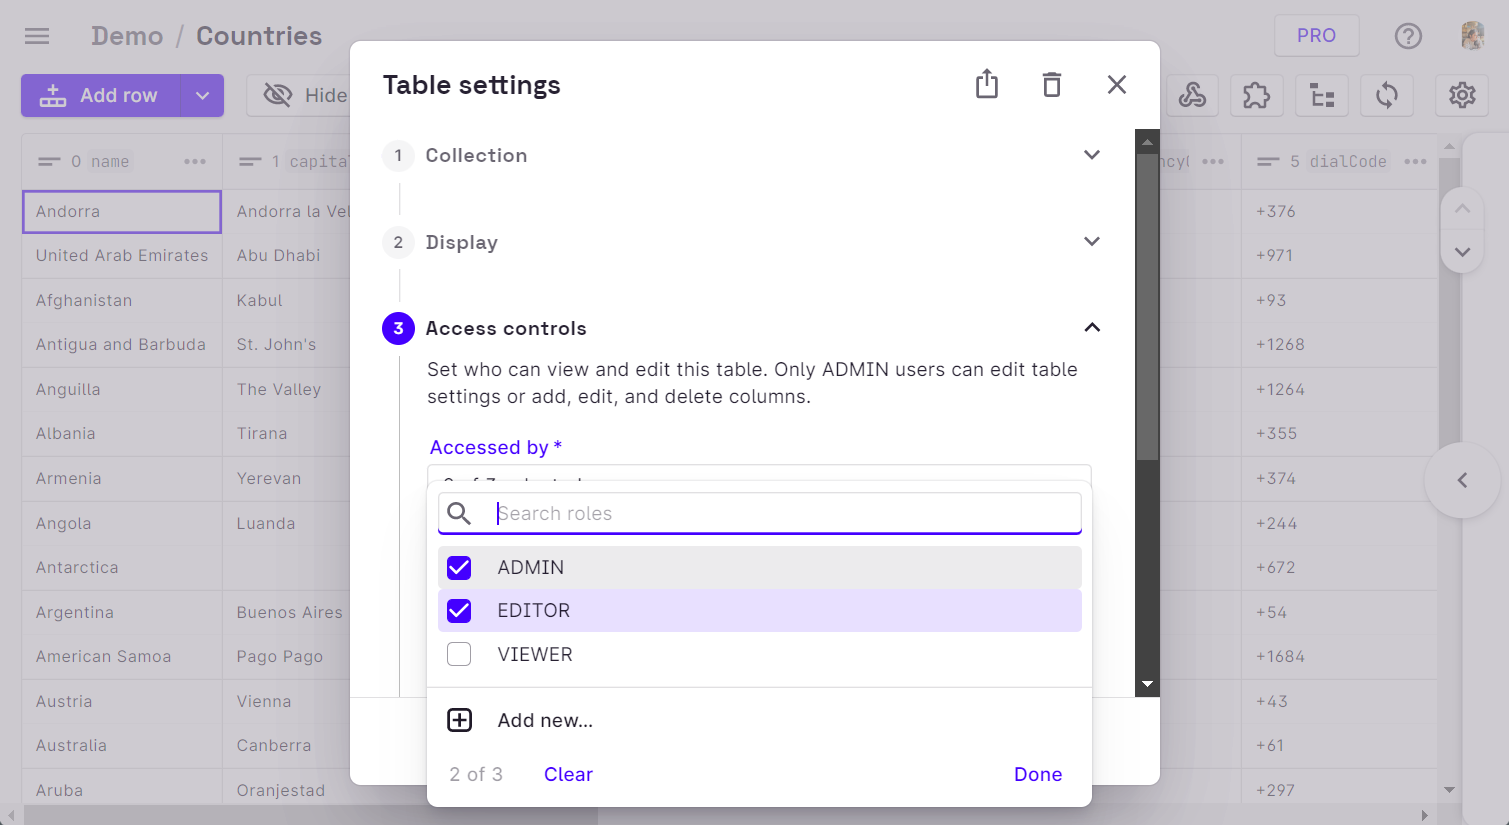
Once a user group has been invited to the table, all members of that specific group will be able to access the table.
Thereafter, we can set the Firestore rules for that particular user group in the Firebase Console.
ADMIN vs. Other User Groups
By default, only the users of the ADMIN user group have the ability to create a table, add columns, and invite other users to the table.
Set user roles using the Firebase Admin SDK (Node.js)
Alternatively, you can run this Node.js script to set roles on a Firebase Authentication user. You can run it in your command line or as part of a Cloud Function.
Required
- Your project’s service account private key JSON file from the Firebase Console in Project Settings > Service Accounts.
- Your Firebase project ID. You can find it in the Firebase Console.
- Create a new folder and save the following script to a file called
set-user-roles.js. - Follow the instructions marked by the
👉in the comments. - Install the Firebase Admin SDK using
npm install firebase-adminoryarn add firebase-admin. - Run the script using
node ./set-user-roles.js.
const admin = require("firebase-admin");

// 👉 Set your rowy admin user email address:
const mainAccountEmail = "YOUR_ADMIN_ACCOUNT_EMAIL_HERE"

// 👉 Set your project ID. Find it in:
// https://console.firebase.google.com/project/_/settings/general
const projectId = "YOUR_FIREBASE_PROJECT_ID_HERE";
console.log(`Running on ${projectId}`);

// 👉 Import your service account key file.
// Make sure to change this path if necessary.
const serviceAccount = require(`./firebase-service-account.json`);

admin.initializeApp({
  credential: admin.credential.cert(serviceAccount),
  databaseURL: `https://${projectId}.firebaseio.com`,
});
const auth = admin.auth();

const setClaims = async (email, claims) => {
  const user = await auth.getUserByEmail(email);
  auth.setCustomUserClaims(user.uid, claims);
};

// 👉 Call the setClaims function. Set the email and roles here.
setClaims(mainAccountEmail, {
  roles: ["ADMIN"],
});
Write Firestore Security Rules with user roles
You can set Firestore Security Rules in the Firebase Console ↗
If you’re not familiar with writing Firestore Security Rules, read the Firebase guide ↗
Required rules
Required
Rowy configuration is stored in the _rowy_ collection on Firestore. Your users
will need read access to this collection and admins will need write access. The
following rules add those permissions.
rules_version = '2'
service cloud.firestore {
  match /databases/{database}/documents {

    // Allow admins to read and write all documents
    match /{document=**} {
      allow read, write: if hasAnyRole(["ADMIN", "OWNER"]);
    }

    // Rowy: Allow signed in users to read Rowy configuration and admins to write
    match /_rowy_/{docId} {
      allow read: if request.auth.token.roles.size() > 0
      allow write: if hasAnyRole(["ADMIN", "OWNER"]);
        match /{document=**} {
        allow read: if request.auth.token.roles.size() > 0
        allow write: if hasAnyRole(["ADMIN", "OWNER"]);
      }
      match /schema/{tableId} {
        allow update: if canModify(tableId,'pc')
        match /{document=**} {allow read,write: if canModify(tableId,'pc')}
      }
       match /groupSchema/{tableId} {
        allow update: if canModify(tableId,'cg')
        match /{document=**} {allow read,write: if canModify(tableId,'cg')}
      }
        function canModify(tableId,tableType) {
        return hasAnyRole(get(/databases/$(database)/documents/_rowy_/settings)
        .data.tablesSettings[tableType][tableId].modifiableBy)
        }
    }
    // Rowy: Allow users to edit their settings
    match /_rowy_/userManagement/users/{userId} {
      allow get, update, delete: if isDocOwner(userId);
      allow create: if request.auth != null;
    }
    // Rowy: Allow public to read public Rowy configuration
    match /_rowy_/publicSettings {
        allow get: if true;
    }

    // Rowy: Utility functions
    function isDocOwner(docId) {
      return request.auth != null && (request.auth.uid == resource.id || request.auth.uid == docId);
    }
    function hasAnyRole(roles) {
      return request.auth != null && request.auth.token.roles.hasAny(roles);
    }

  }
}
Table rules
Write table rules that match the roles you set in your table settings. The
following are examples of different table rules, using the helper functions in
the required rules above.
Read more about how to write rules ↗
Set Firestore Security Rules in the Firebase Console ↗
Example: Collection open to public
match /openToPublic/{docId} {
  allow read: if request.auth != null;
  allow write: if hasAnyRole(["ADMIN", "EDITOR"]);
}
Example: Collection and subcollections open to public
match /openToPublicWithSubcollections/{document=**} {
  allow read: if request.auth != null;
  allow write: if hasAnyRole(["ADMIN", "EDITOR"]);
}
Example: User data
match /users/{docId} {
  allow create: if request.auth != null;
  allow get, update, delete: if isDocOwner();
}
Example: Admin-only
match /adminOnly/{docId} {
  allow read, write: if hasAnyRole(["ADMIN", "EDITOR"]);
}